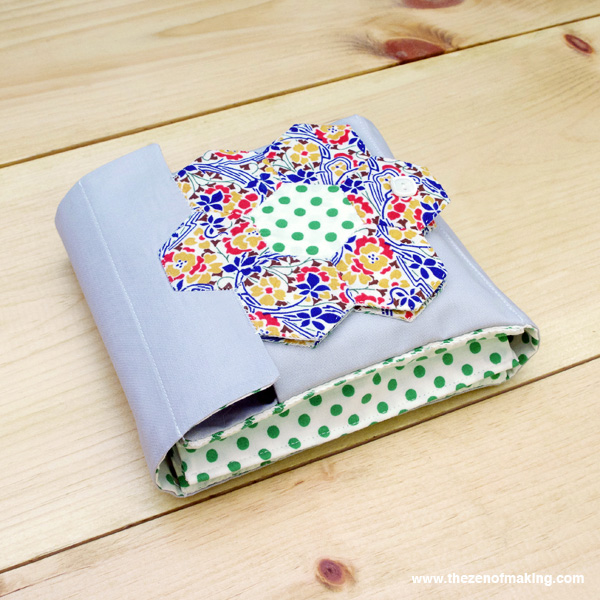
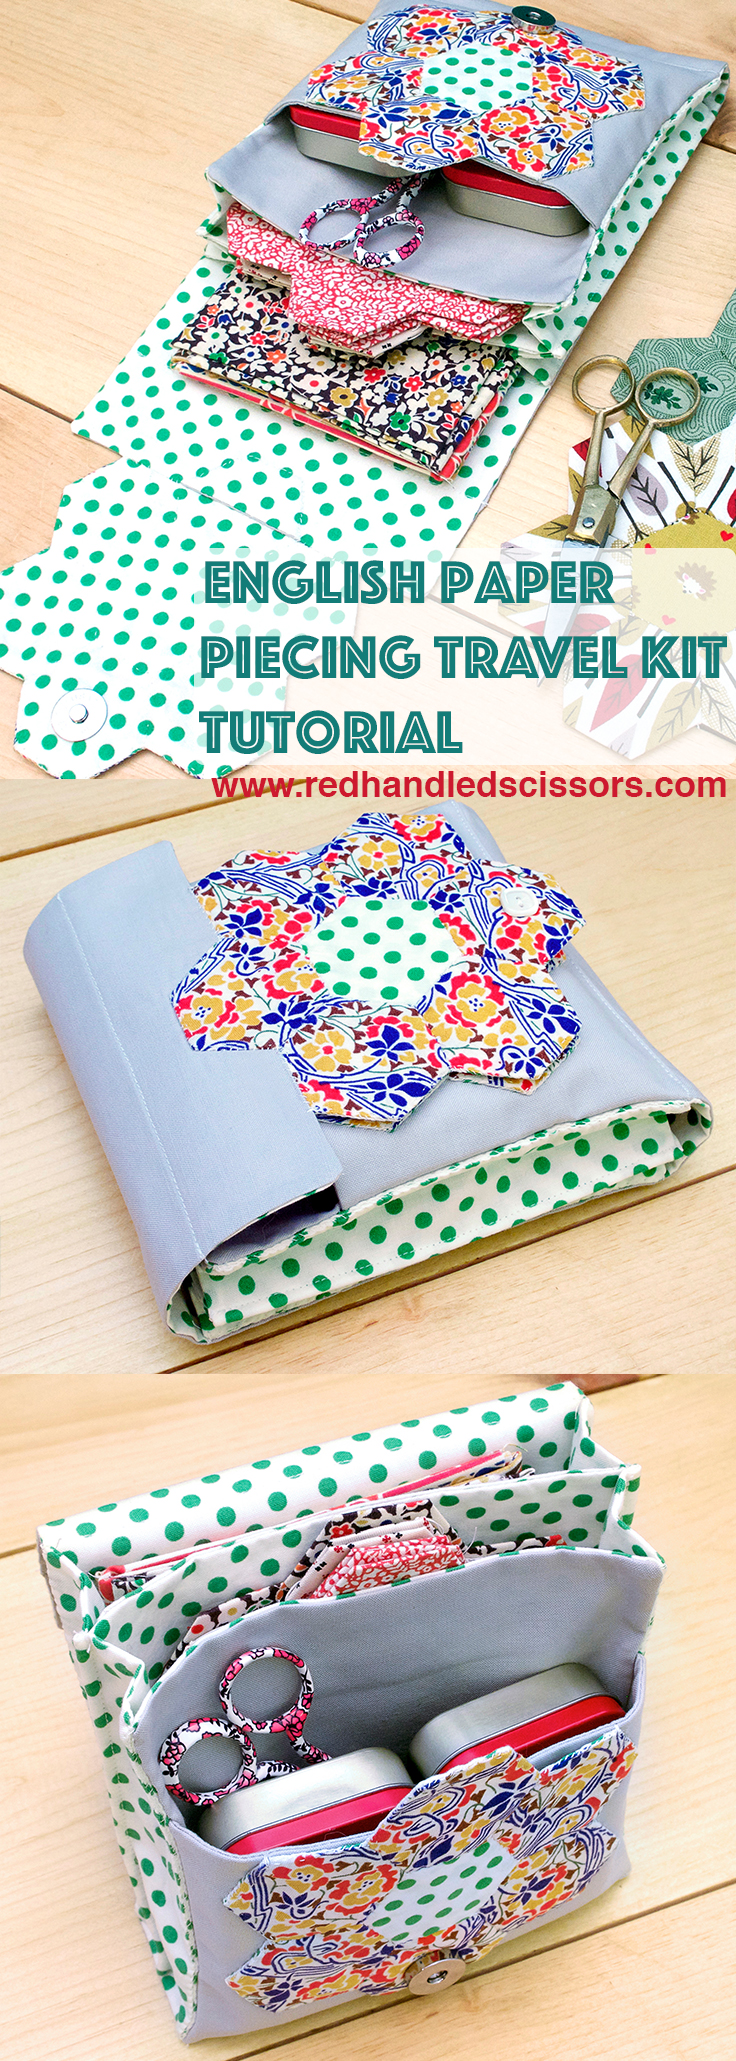
Hexie obsessed? Get your quilting fix on the go with part 3 of my English Paper Piecing tutorial series: the English paper piecing travel kit!
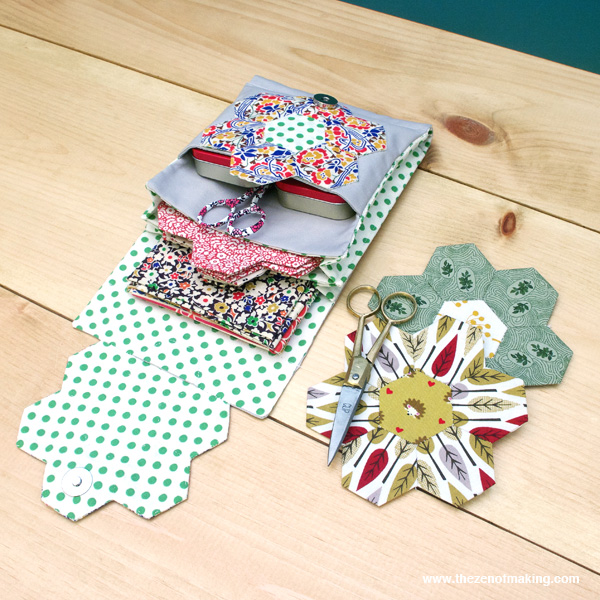
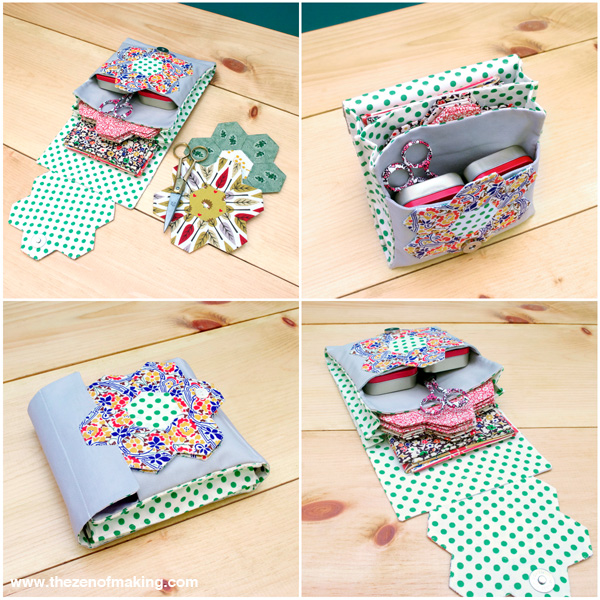
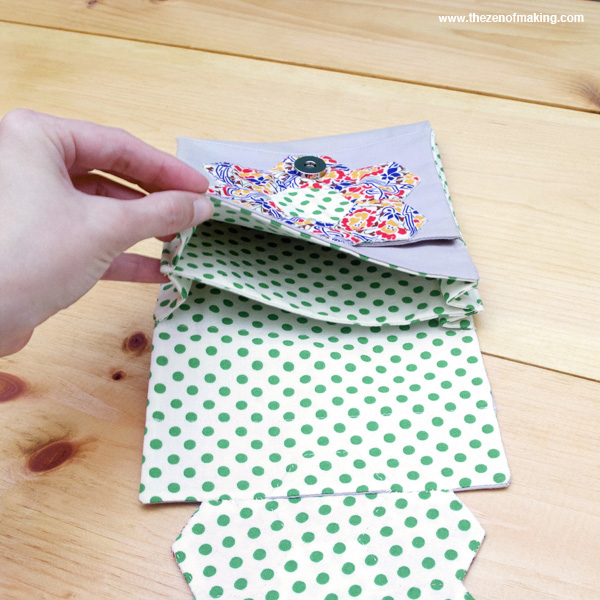
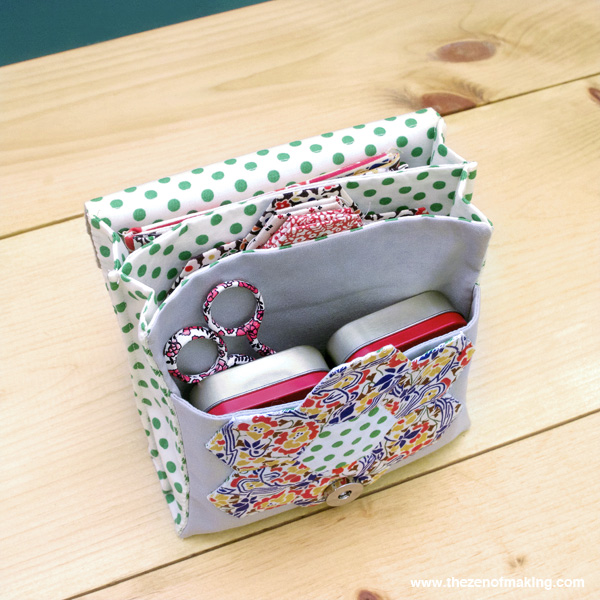
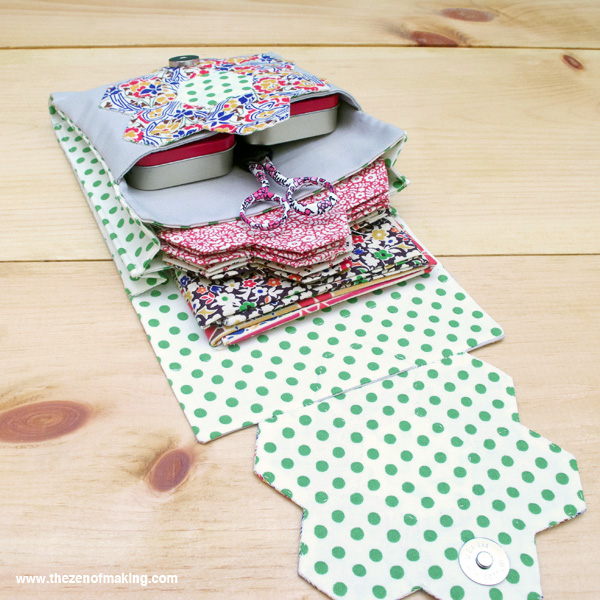
Designed with mobile crafting in mind, my English paper piecing travel kit has two main compartments—one for holding fat quarters and spools of thread and the other for organizing stitched hexies and finished blocks—plus an outer pocket that’s the perfect size for two altoids tins—one for paper templates and one for sewing supplies—and a pair of scissors. Closed and fully loaded, the travel case is a 6" x 6" square that’s only about 3" thick, so it’s the perfect size to toss into a purse, tote, or project bag. Ready to make one of your own? Download my **free printable pattern, and let’s get started!
 In the mood to accessorize? Add a custom snap-on pincushion to your finished project with my English Paper Piecing Travel Kit Pincushion Tutorial! In the mood to accessorize? Add a custom snap-on pincushion to your finished project with my English Paper Piecing Travel Kit Pincushion Tutorial! |
**This project and pattern are for PERSONAL USE ONLY. If you would like to license this project and pattern for teaching purposes or require information regarding selling items that you make with this pattern, please see the permissions section of my legal disclosure, then contact me directly for further details.
Note: Apologies to those of you who’ve been waiting patiently for this third EPP tutorial installment. Due to the nature of the project, the pattern tech editing and step-out photography took a bit (okay, a lot) longer than usual.
Please note that the links to supplies and tools that are provided below are affiliate links, and I will be compensated if you choose to make a purchase after clicking through.
Supplies:
* English Paper Piecing Travel Kit PDF, printed at full scale, cut out, and assembled (This pattern is for personal use only.)
* Cotton fabric and lining fabric, ½ yard of each
* 2 hexagon flower blocks
* ¾" magnetic snap
* Decorative button (optional)
* Fusible interfacing, ½ yard medium weight
* Interfacing, one 1 ½" x 1 ½" square heavy weight
* 2 Altoids tins, one to hold paper templates and one Altoids Tin Sewing Kit
Tools:
* Small crochet hook
* Iron and ironing board
* Fabric scissors
* Paper scissors
* Chalk pencil
* Tailor’s awl
* Sewing machine
* Scotch tape
* Clover Wonder Clips or straight pins
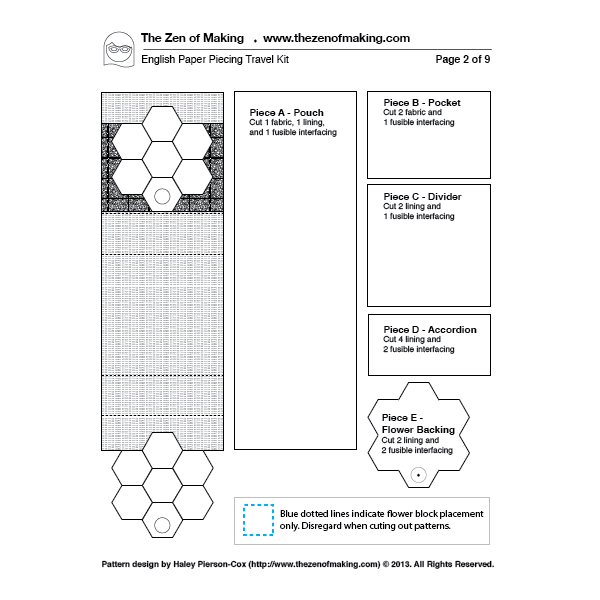
- Print the English Paper Piecing Travel Kit PDF at full scale. (This pattern is for personal use only.)
Cut out the pieces, then attach the three sections of pattern piece A with scotch tape at the cut marks. (Don’t print the image above—it’s just a sample, not the full pattern.)
If you’d like to confirm that you’re printing out the pattern at the right scale, the pattern piece dimensions (including seam allowances) are as follows:
- Piece A: 18 3/16" tall x 6½" wide
- Piece B: 4⅞" tall x 6½" wide
- Piece C: 6½" tall x 6½" wide
- Piece D: 3½" tall x 6½" wide
- Piece E: will fit in a square that is 5¾" tall x 5¾" wide
- Finished hexagon flower blocks: 5 3/16" tall x 5" wide
The dimensions of the finished project: 6" tall x 6" wide x about 2" deep (when filled with supplies)
Note: A ¼" seam allowance is included on the printed pattern pieces and is denoted by a grey line around each shape.
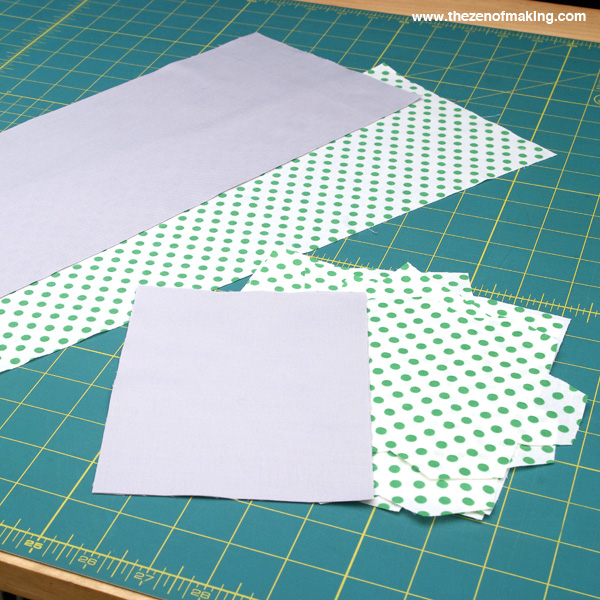
- Cut fabric, lining, and interfacing in the quantities indicated on each pattern piece.
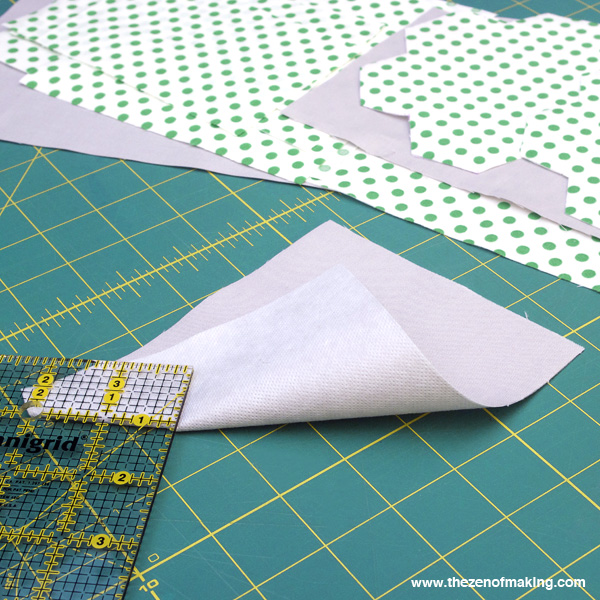
- Using an iron, adhere the fusible interfacing to wrong side of the following:
- the lining fabric of the pouch (pattern piece A)
- one of the pocket pieces (pattern piece B)
- one of the divider pieces (pattern piece C)
- two of the accordion pieces (pattern piece D)
- both flower backing pieces (pattern piece E)
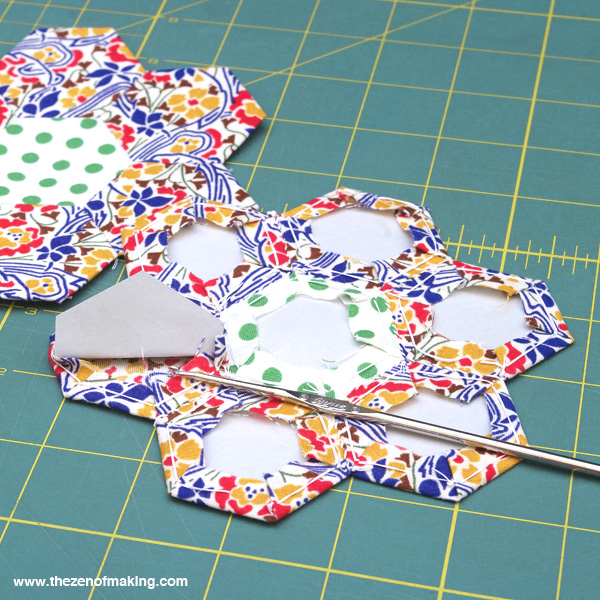
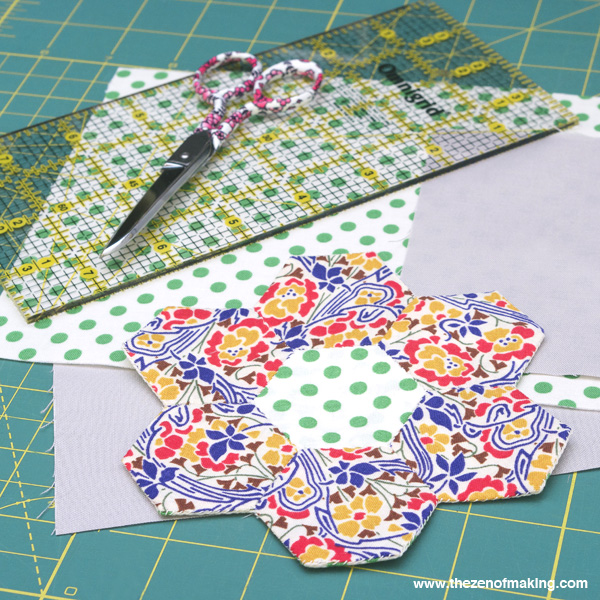
- Press the hexagon flower blocks gently with an iron to secure the creases, then, leaving the basting stitches in place, use a small crochet hook to carefully pop out each paper template.
To do this, gently insert the crochet hook under the folded-over fabric edge with the hook facing down, then feel for the edge of the paper template. Once you feel the template edge, grab the template with the hook and wiggle it a bit until the edge pops out. Once one edge is free, the rest of the template should come out with a gentle tug. (Folding the template can also make them easier to remove.)
When all of the templates have been removed, press the flower blocks flat. Unless they’re visible through the front of the blocks, there’s no need to pull out the basting stitches.
With the fabric and the flower blocks ready, it’s time to construct the travel kit.
First, we’ll prepare the two flower backing pieces to be stitched to the back of each flower block.
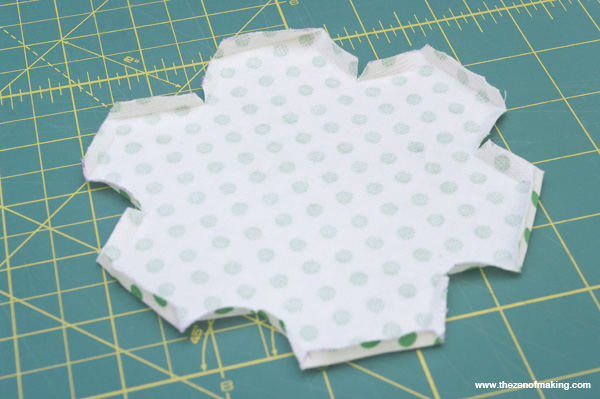
- Fold the edges around the backing over ¼" and press in place. Where the two folds cross between each petal, use a pair of fabric scissors to carefully cut a notch that just meets the point where the two creases intersect. This will allow the folded edge to lie flat.
Once all creases have been made and all notches have been cut, press each flower backing piece one more time to secure the folds.
- Select the flower block that you will use for the pocket, then, with wrong sides facing, secure one of the flower backing pieces to the back of the block by making small whipstitches around the edge.
Let’s install the magnetic snap.
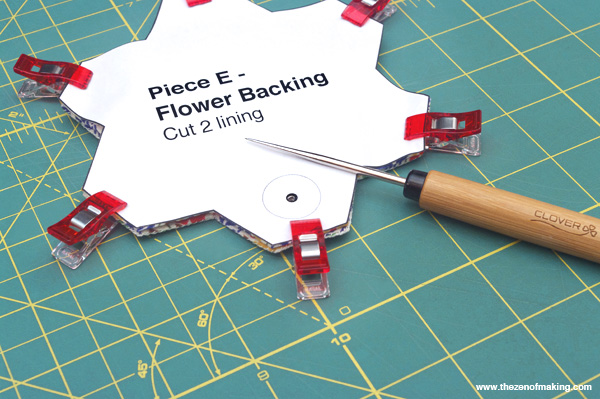
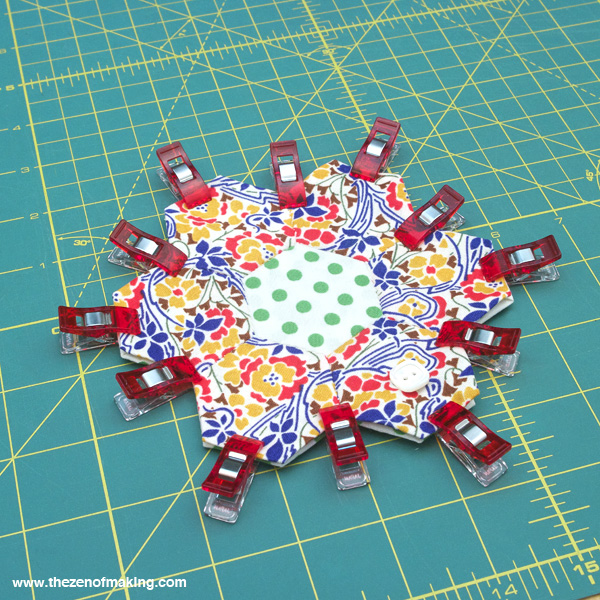
- Use paper scissors to cut the seam allowance off of the flower backing template (piece E). Stack the remaining pressed flower backing on top of the backed flower block that you finished in step 6, lining up all of the edges. (If needed, you can use Clover Wonder Clips to hold them in place.)
Using the black dot in the center of the button outline on the template as your guide, use a tailor’s awl to punch a hole in the same place through all three layers of fabric, marking the location of the snap.
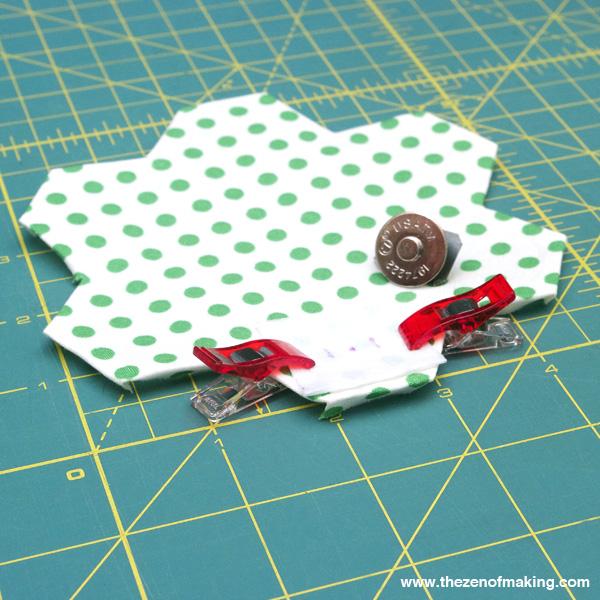
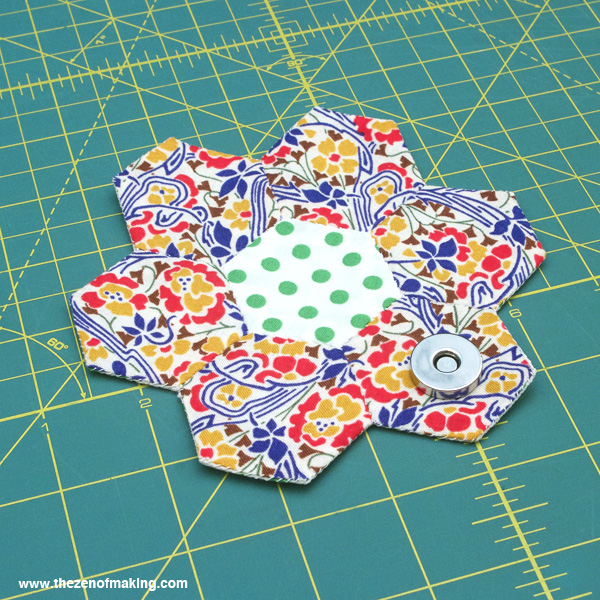
- Cut a 1½" square of heavy interfacing (to reinforce the snap), then place it over the hole on the wrong side of the remaining flower backing, pinning or clipping it in place. Next, on the right side of the flower backing, center the male end of the snap over the hole in the fabric, then install it on the petal per the directions on the packaging, punching the prongs through the fabric and the extra square of interfacing. (I generally use an X-Acto knife to pre-cut the holes for the prongs.)
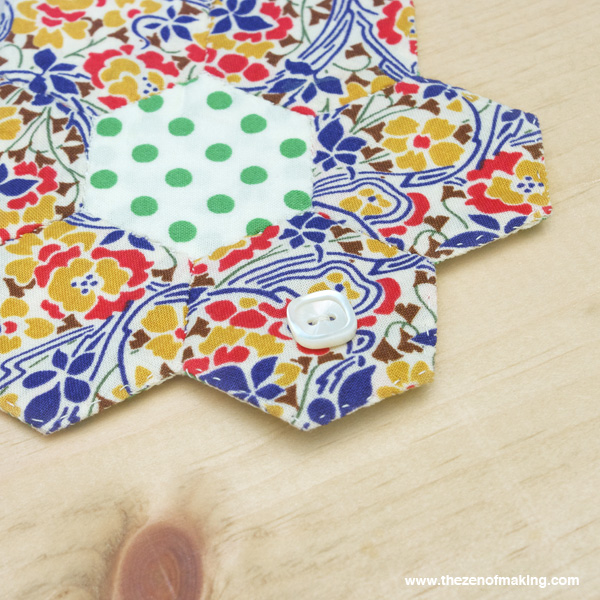
If you’d like to add a decorative button to the front of the flower block where the closure will be, you should do so now before the backing is attached to the block.
- Place the second flower block on top of the flower backing from step 8, lining up the edges. Then, using small whipstitches, sew the backing to the flower block.
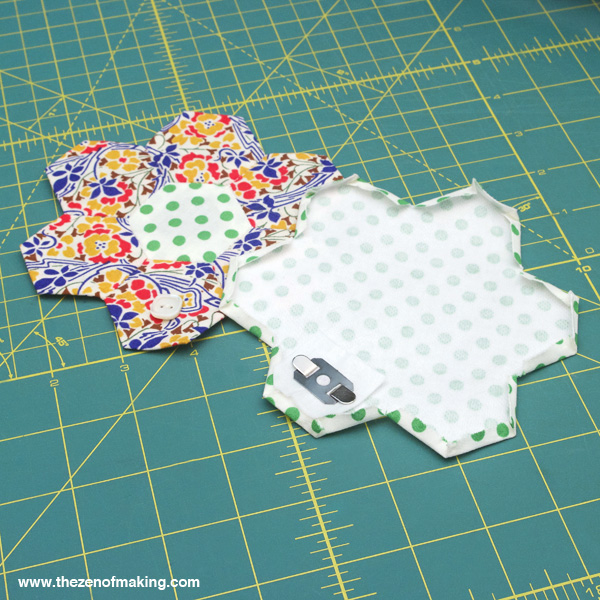
- Install the female end of the snap on the flower block that will be used for the pocket, punching the prongs through both layers of fabric.
- Once the snap pieces are in place, use hand quilting stitches or machine sewing to stitch around each hexagon, securing the flower backing to each of the flower blocks.
Next, we’ll prepare the pocket, the divider, and the accordion sides before we combine the pieces to create the pouch.
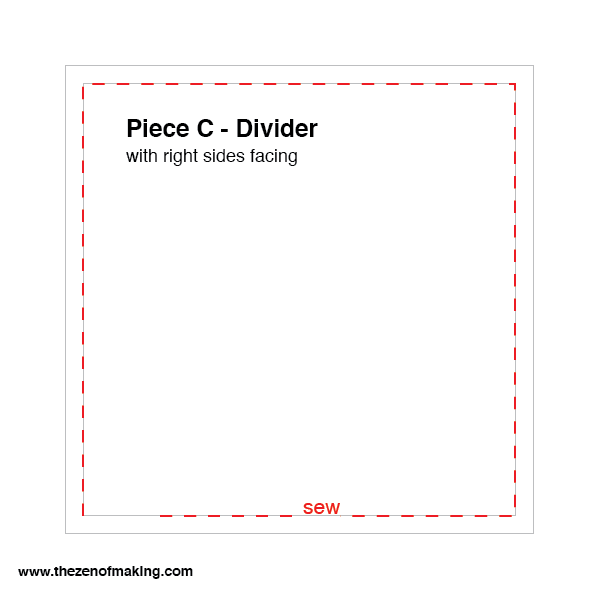
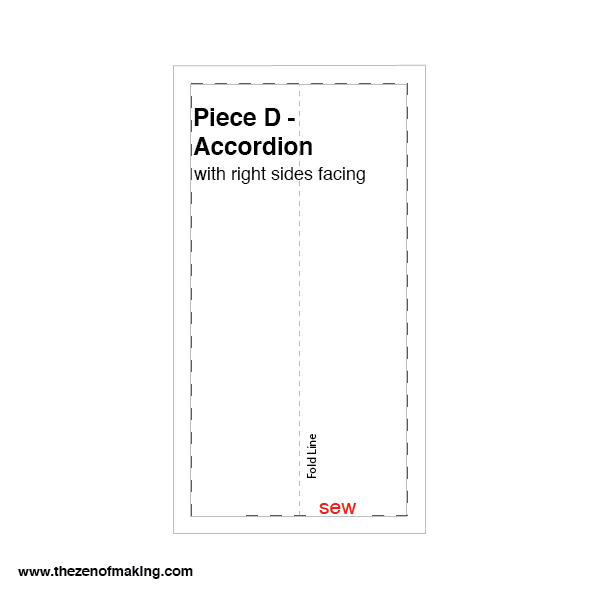
- With right sides facing, use your sewing machine to sew the following pieces together as shown in the illustrations:
- Pocket pieces (piece B): With right sides facing, sew the two pocket pieces together across the top and bottom edges using a ¼" seam allowance.
- Divider pieces (piece C): With right sides facing, sew the two divider pieces together around all four edges using a ¼" seam allowance. Leave a small opening at the bottom unsewn to allow you to turn the pieces right side out after sewing.
- Accordion pieces (piece D): With right sides facing, sew two of the four accordion pieces together around all four edges using a ¼" seam allowance. Leave a small opening at the bottom unsewn to allow you to turn the pieces right side out after sewing. Do the same for the two remaining accordion pieces.
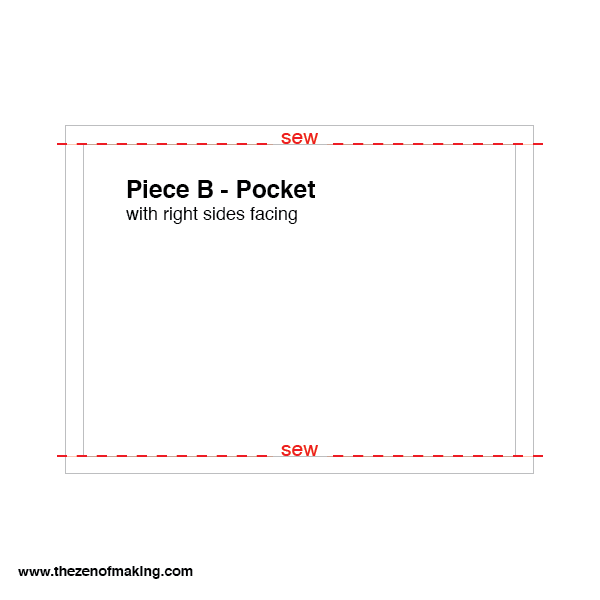
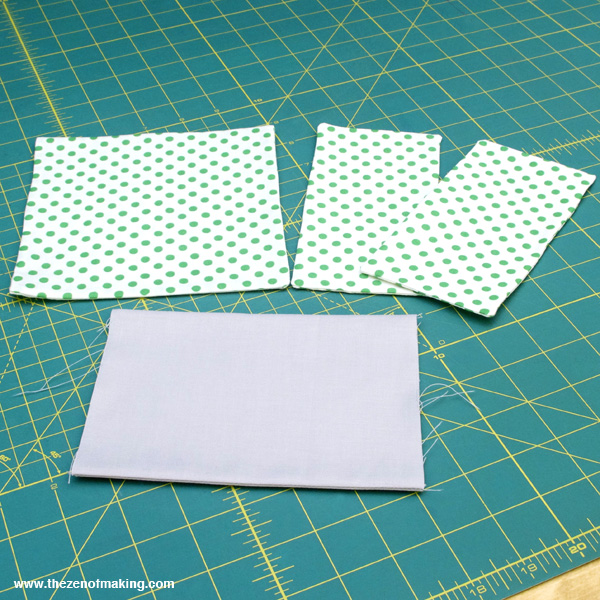
- When the sewing in step 12 has been completed, turn the sewn pieces right side out and press flat, then use small whipstitches or a ladder stitch to close the openings that remain on the bottoms of the divider and accordion pieces. Press flat again.
Now we’ll assemble the divider.
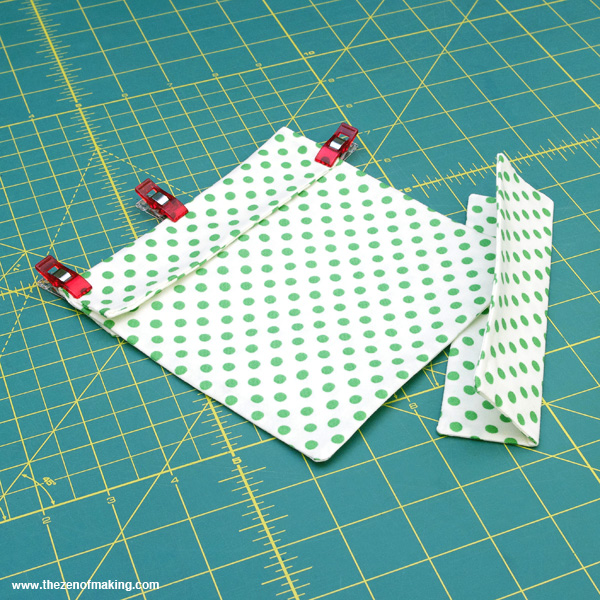
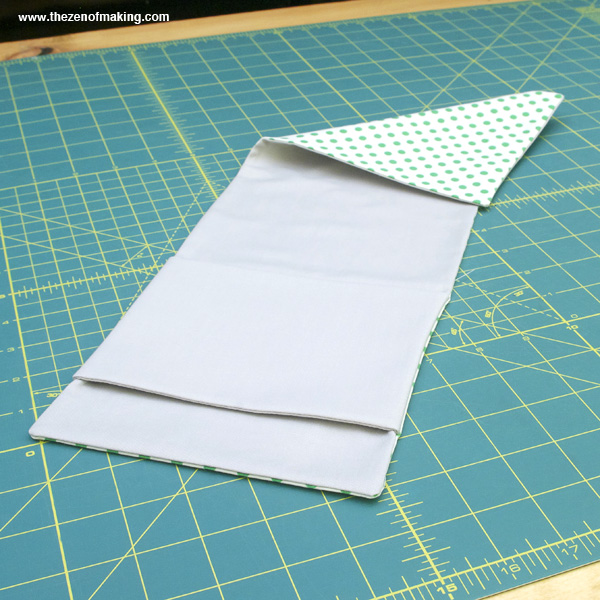
- Fold the two accordion pieces (piece D) in half at the fold lines shown on the pattern and press the crease on each. Insert the divider piece (piece C) into the folded accordion pieces, lining up the left and right edges of the divider piece with the creases in the folds of the accordion pieces. Use clips or pins to hold the pieces together.
- Using your sewing machine, sew the accordion pieces to the divider piece along the two folded edges using a ¼" seam allowance.
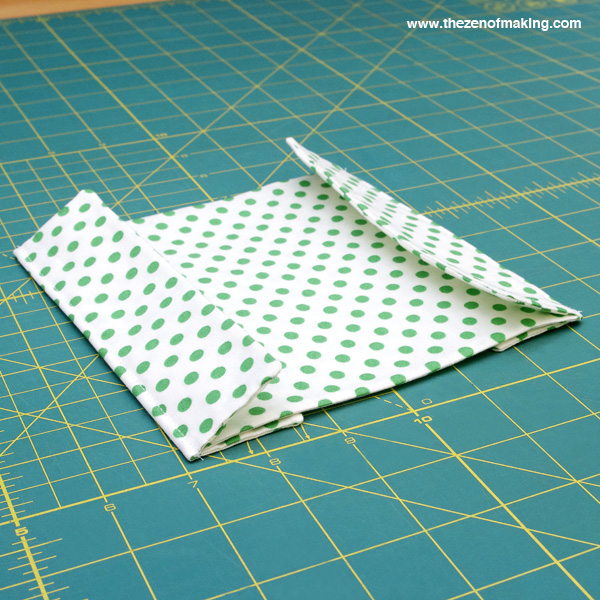
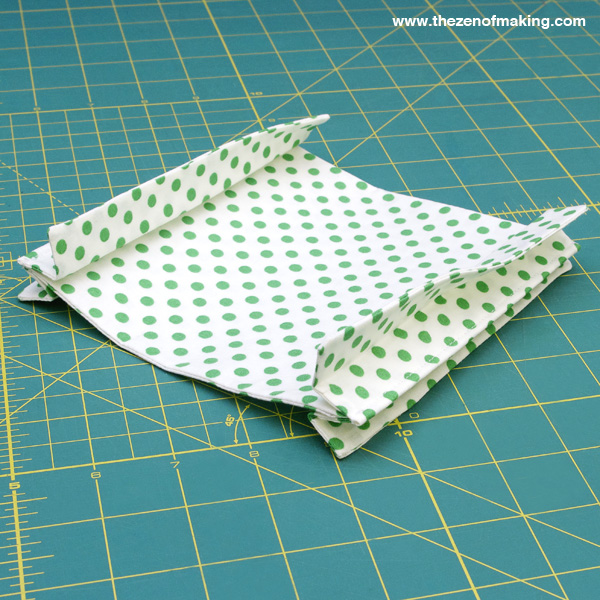
Once the pieces are secured, fold the two flaps on each accordion piece back toward the edge you just sewed and press the crease with an iron. This will create the folds that will allow the sides to expand and contract as needed.
Hooray! It’s time to construct the pouch!
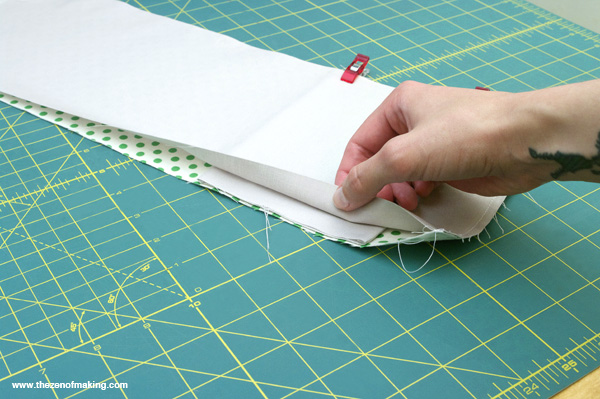
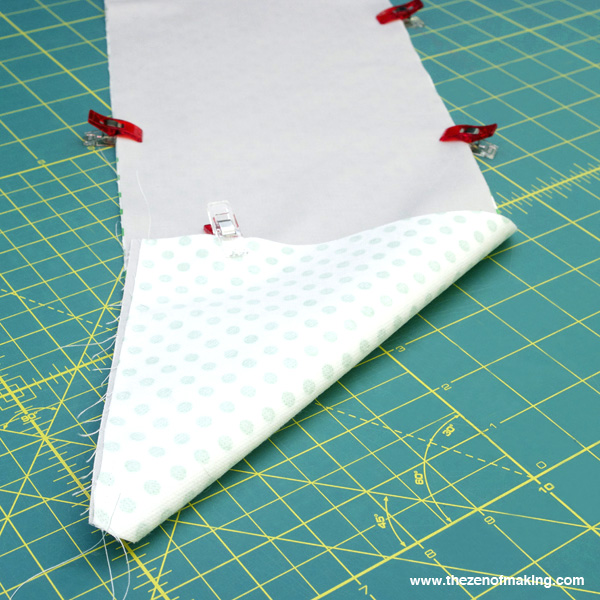
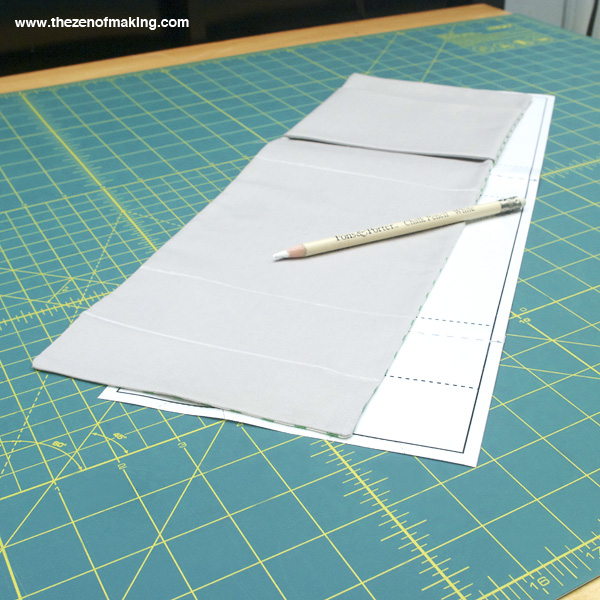
- Using the paper pattern for the pouch (piece A), mark the location of the pocket on the right side of the pouch fabric. (The bottom of the pocket coincides with the first fold line on the pattern.) Put the pocket in place on top of the fabric, then stack the lining on top of the pocket with right side facing down. The pouch fabric and lining should now be lined up with right sides facing, and the pocket should be sandwiched between the two layers of fabric.
Hold the three pieces together with clips or pins to ensure that the pocket remains in the correct place.
- Using your sewing machine, sew the two pouch pieces together around all four edges using a ¼" seam allowance, leaving a small opening along the bottom edge to allow you to turn the pieces right side out.
- Once the edges are sewn, turn the pouch piece right side out, positioning the pocket on the fabric side. Press flat, then use small whipstitches or a ladder stitch to close the opening on the bottom. Press flat again.
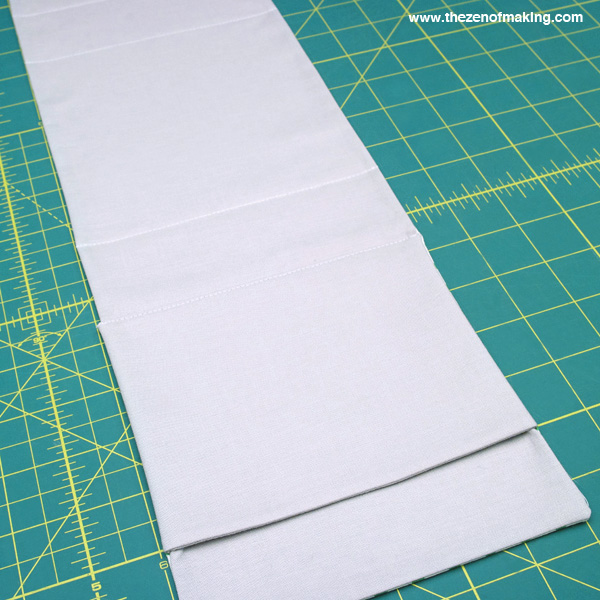
- Use the paper pattern to mark the fold lines on the pouch. The first fold line falls at the bottom of the pocket, so use your sewing machine to stitch the bottom edge of the pocket to the pouch, sewing as close to the edge of the pocket as possible. Next, sew along each of the remaining three fold lines.
Insert the divider.
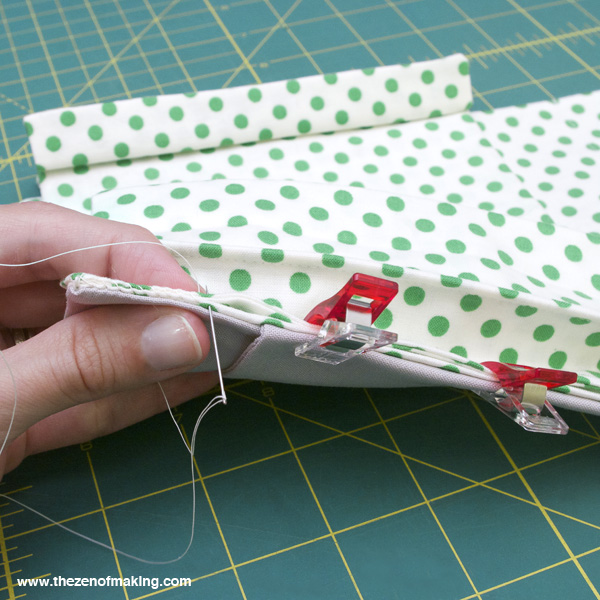
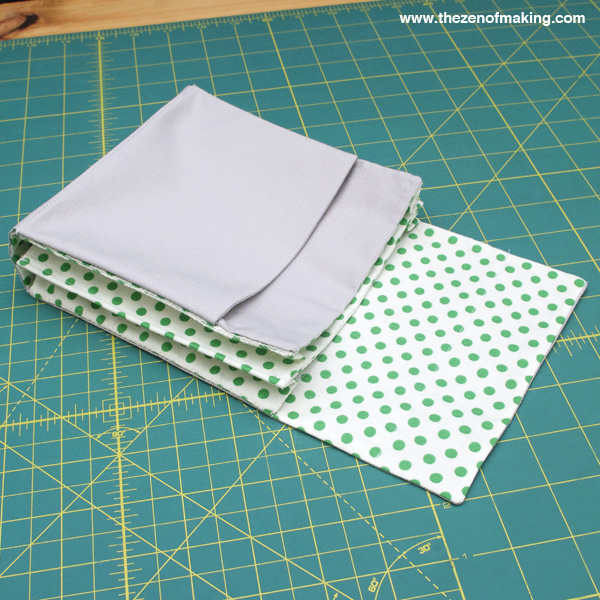
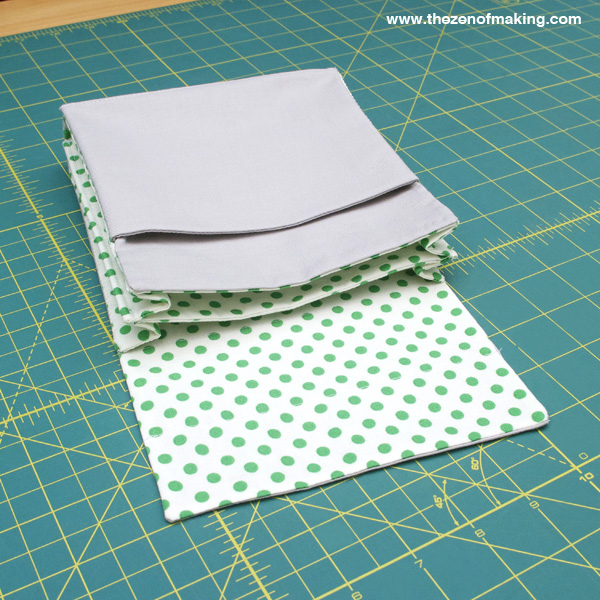
- With the lining side facing up, place the accordion divider at the pocket end of the pouch, lining up the top of the divider with the top edge of the pocket and bottom of the divider with the first fold line (the bottom of the pocket). The accordion flaps should line up with the left and right edges of the pouch. Once the divider is in place, sew the two accordion flaps that are positioned against the pouch lining to the left and right edges of the pouch with small whipstitches.
Fold the pouch piece over at the second fold line, enclosing the divider within the pouch. Align the bottoms of the two remaining accordion flaps with the second fold line and the tops with the third fold line, making sure the edges of each flap line up with the side edges of the pouch. Whipstitch the accordion flaps to the left and right edges of the pouch.
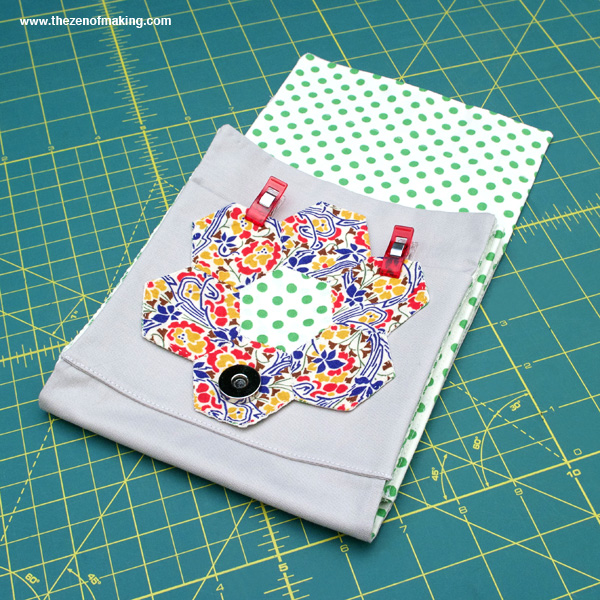
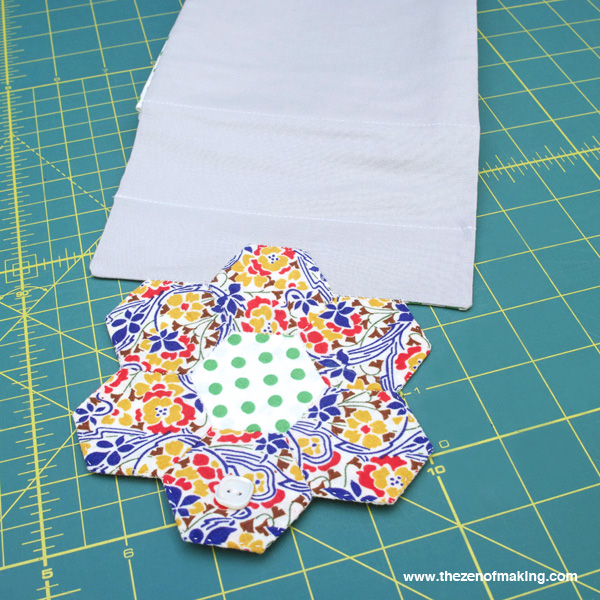
- Using the paper pattern as a guide, position the flower block with the female side of the snap on the pocket, then sew it in place by hand. (You can use a straight stitch to appliqué the piece to the pocket or a ladder stitch to join the two fabrics more invisibly. I used a ladder stitch and sewed through only one layer of the pocket fabric.)
- Finally, use whipstitches (plus a few straight stitches when you get to the top petal) to attach the second flower block to the edge of the flap at the top of the pouch, making sure that the snap pieces are properly aligned before sewing.
- Load your new travel kit with fat quarters and sewing supplies, and you’ll be ready to get your stitch on wherever you go!
This project and pattern are for PERSONAL USE ONLY. If you would like to license this project and pattern for teaching purposes or require information regarding selling items that you make with this pattern, please see the permissions section of my legal disclosure, then contact me directly for further details.

Holy cripes, Girl – this is EPIC. I love the structure of this thing, and I especially love how beautifully you explained the pattern assembly. It’s a perfect case for carrying EPP in progress. And a great big act of generosity on your part, sharing this beautiful, detailed pattern with the world for free. Thank you so much!
Thanks, Diane! This tutorial got a little bit out of control, but I sure am pleased with how it turned out. (And, since I took it out into the world for some bar crafting last night, I can officially confirm that it worked exactly as planned. Hooray!)
Muito lindo o trabalho
Thank you!
Thank you! This looks wonderful!
You’re welcome–glad you like it! :)
Great job! I’ll have to add this to my sewing project queue. The instructions and pictures are amazing. Thanks for sharing!
Thanks! Happy making!
Thank you for such a useful lesson.
I just found this on Pinterest and had to stop over and tell you how much I LOVE this :-) Great work and thanks for sharing your tutorial!
Cindy
Thanks so much! Enjoy the project. :)
Thank you for this pattern and the previous two tutorials that will make doing this so much easier. I have saved them all and look forward to trying this. Right now, I keep all my little parts in a plastic photo holder (found in the scrapbook section). But … this will be much more fun to tote around and share with my quilting friends.
You’re welcome! I can’t wait to take mine to my next crafty meetup too! :)
Excellent tutorial. So much effort has gone into this. brilliant!
Thank you, and enjoy the rest of those blocks! (Perhaps there’s a throw pillow in your future?)
Is the paper left inside?
Nope, the paper should be removed! (Check out step 4 for instructions.)
This is exactly what I have been looking for. I will need to quickly make one before I go on my cruise in a few weeks. Thank you so much.
Wonderful–so glad you like it. Enjoy your trip!
Thanks for sharing. I am just about to make one and your tutorial is easy to understand although I am quite a beginner. Great idea!!
Thank you very much.
The travel bag is so cute and your tutorial absoutely perfect!
So super kind of you to share ☺
Bente
Thank you for sharing this lovely tutorial. I’ve just made a slightly wonky hexagon holder modified from two tutorials, one a needle book and another a hexagon pouch. I wish I saw your tutorial before starting on mine, would have avoided a lot of unpicking and swearing when things went wrong! I might just make another one following your tutorial before we go on the next holiday!
Thank you so very much for this tutorial and for your generosity in sharing it for free. I just started following you recently, and I am really enjoying it so far. Again thank you so much.
Thank you so much for such a well detailed tutorial. The directions were perfectly clear. I also love how I could click on an item on the supply list and it showed exactly what it was and in most cases where to find it. Can’t wait to make one or two of these as gifts, that’s if I will be able to part with them. Thank you again :-)
Wow, this is cute. A good project for using Inklingo. So much easier than EPP.
Fabulous! Itching to start this :)
I love this idea and pattern. But, instead of a sewing kit, I am going to make mine into a First Aid Travel kit. It seems like we always could use a band-aid or something when we go fishing. Thank you
Wish you had this in a printable form so I could download a PDF and print it out. Love the pattern.
The pattern is actually only available in a printable PDF. You can find the file link at the top of the supply list. :)
No, I actually meant the written instructions and the pictures, they would be great in a PDF from. The PDF download I got only gave the pattern pieces.
Oh, gotcha. If you hit the “print” button in the social sharing block at the end of the post, there’s a PDF option for printing the post with instructions and photos. Hope that helps!
I am totally blown away! So clear and the accordion part is amazing! I have been wondering how I would make one & here you are. Thanks so much!
I love the Altoids containers, but hate Altoids (and so do most of my friends, so no sneaking theirs!), so I found them at an online company. Plus, a friend has a lazer for engraving, so I can have him personalize them for my friends when I give this as a gift this year! http://www.specialtybottle.com/tinrectangular39by245hinged.aspx
This is wonderful, thank you for being so generous to post this. Would you be able to give me an indication of how long the travel kit would take to make? I’ve made quite a few hexies in the past so I’m pretty quick at them. I want to make this kit for a friend but need to have it done in the next couple of weeks, just wondering how much time I need to allocate? The two little people at my feet don’t want to give me too much time to myself!
You’re very welcome!
Re: time to make: I made mine in the span of about a week, but my hexagon blocks were already sewn and I was also photographing the tutorial and writing the instructions at the same time. If working uninterrupted, I think I could probably whip one up in a couple of days, so I’d think that a couple of weeks should be enough time, especially if you happen to have a chunk of time to work each day after your little ones head to bed. I hope that helps!
Masterful instructions and pictures. Beautiful little case for travel!
I am so excited! Do I remember seeing these at market when we met?
This is an incredible tutorial. Thank you so much for it, I look forward to making this. Happy New Year!!!
Is there supposed to be a seam allowance line on the sides of the pouch pattern? Just checking before I cut. Thanks.
Yep, there’s a 1/4″ seam allowance around the outside edge of the pouch. (On the pattern PDF, the seam allowance is the lighter gray line that’s around the outside of each pattern piece.)
But there’s no line on the pouch pattern itself. There are lines on the other pieces, but not on that one. Should I add 1/4″ to that one? When I lay the pocket pattern on top of the pouch, the pocket extends 1/4″ beyond. Thanks for your help.
I am so sorry, just looked at the pattern again…the lines must not have printed on my print-out. The seam allowances are there. Thanks for answering.
Glad you got everything sorted out! PDF printing can be mysteriously and maddeningly glitchy sometimes. :)
Thank you so much for this great tutorial! I’ve just finished making this. Your clear description and pictures made it really easy to put together, depsite the fact that I’m only just learning to sew.
You’re very welcome! Enjoy your travel kit! :)
Thank you so much for this fab tutorial ! I love hexies and I had to make one !!! So net and compact , perfect storage for all my supplies !
Thanks a lot for sharing this beautiful pouch. I ‘m just trying to make it and I have a doubt. Must the fusible interfacing have the seam allowance?
Yes, the fusible interfacing is applied to the fabric before you sew, so it should include the seam allowance.
Bonjour, je découvre votre blog et le tuto es formidable ,mais pour moi il y a un petit souci es que vous pouvez me donner les mesure en centimètre si vous plais car je suis perdue.
Merci bon dimanche ensoleillé. Caire
Hello! Here’s a good online tool for converting inches into centimeters: http://www.metric-conversions.org/length/inches-to-centimeters.htm
Is it possible to print the actual instructions for this project with the colour photos? I have printed the 9 pages and also one coloured photo to show me the project but would like the requirements and instructions printed too. How do I go about this as anything that I have tried hasn’t worked. Thankyou, I am really looking forward to making this project as I just LOVE hexagons and EPP in general. I’m in Brisbane, Australia and would love to show this to some of my friends at a group I go to tomorrow.
If you click the print button in the social sharing block at the end of the post, you can print out the full tutorial to use as a reference while you’re working.
Is it possible to get the dimensions of the pieces, other than the hexie flowers? Its a great little project that Id love to make.
Thanks!
I added the dimensions of the pattern pieces in step 1–I hope that helps!
I didn’t originally include the dimensions because the pattern is downloadable (and has a 1″ scale check box on the first page, so you can confirm that you’re printing it out at the right size). It’s designed for stitchers to be able to just cut it out and go, no measuring required. :)
heh…I just saw the reply, gmail for some reason marked it as spam. I had originally had printer issues , but was able to beat it into submission. Thanks for the update. I finished the pouch in time for my trip, yay!! I loved your use of altoids tins. They also have the small tins which are great for half hexies and other shapes.
So glad it all worked out!
I do love me some Altoids tins–useful for just about everything!
Hello Haley
I have just discovered your blog and particularly your English Paper Piecing Travel Kit.
I have myself a blog in France which I invite you to visit to discover in it a beautiful Adventure of the Friendship which is going to cross the borders. I hope for it!
Maybe would like you to join us and make travel one of your creations and particularly your English Paper Piecing Travel.
If you want to join us, do not hesitate to contact me
Maybe goodbye
Friendly
Gil
I just have one question so far. Is the fusible interfacing ironed to the back of the flower fronts or to the backing to the flowers? In the step that shows you preparing the back of the flowers there is no interfacing showing so should I assume that it goes on the back of the pieced hexxie flower? I couldn’t seem to find that in your excellent instructions so I am sure I am missing something!
The fusible interfacing is ironed to the wrong side (back) of the flower backing pieces. (You can find a full list of the pieces that need interfacing in step 3.)
Thanks for your kind words! Enjoy your stitching. :)
Thanks for this cute idea, I just made two of them, but actually put the pocket on the inside, oh, well, it is cute, and I appreciate knowing how to do it. Thanks for that. Carolyn Hoxton
Success! I made one: http://grannymaudsgirl.wordpress.com/2014/07/23/hexagon-travel-kit/
It looks fantastic–I’m so in love with the red fabric!
Thanks a ton for sharing your link. :)
Thank you for the pattern, i love to do this but never knew were to keep them.
Gina
Hi,
I’ve made one of you English Paper Piecing travel kits and just love it.
Here is a link to my blog post.
hhdesigns.blogspot.ca/2014/09/english-paper-piecing-travel-kit.html
Hope this works.
excelente tutorial bien explicado resulta fácil de poder realizar, gracias
While unpacking some boxes, I found some of my EPP materials! Your tutorial makes me want to upend all the remaining boxes to find the rest! Thanks for such a simple walk through! <3
Thanks for this fabulous tutorial. Gonna make one!
Hello Haley, thank you so much for your wonderful tutorial… I saw your hexie travel kit on a blog last year… it was love on the first sight and now I made one:
https://knettycraft.wordpress.com/2015/03/09/first-blogiversary-a-giveaway/
… linked back in my post to your blog. Take care, Annett
Epic is Right,I was just thinking the other day,I need to make a something for my EPP,
then you have this amazingly functional pouch .I some small tins too.I found you on “Messy Jesse” on Pinterest.Thank you. Guess what I am making today.Brilliant project.
I made this today. Because of the way I think, I had to take two separate seams apart but I finally got on the right track. I love the way it looks and I am sure I will get a lot of use out of it.
Thanks for the tutorial!
This is so cute. My friend and I EPP. I’d love to make this for her, but she uses 1.5″ hexiies. Do you think I could print the pattern at 150% and make it work for her?
I don’t see why not!
You might want to check with your friend to get the diameter of one of her finished blocks first, then check to make sure that the 150% adjustment yields the correct width and height in the pattern.
If you try it, I’d love to hear how it turns out!
I love this idea! I haven’t started doing hexies yet, but think they will be an ideal summer project for when I am away and can’t use my sewing machine. This little kit idea will make taking them with me so much easier! Thank you!
Just a quick question – would KAM snaps work instead of the magnetic clasp? I think I would need to put some of the firm interfacing in the hexie where each part will go, but I assume I would just install the snaps at the same time you did the magnetic clasp?
Seems like it should work just fine!
Thank you!
Thank you so much for generously sharing this pattern and for going through the trouble of writing an extremely good tutorial to go with it. Your instructions are precise, detailed and easy to follow, even for someone with little experience in both sewing and EPP.
I made the kit for myself and although mine isn’t perfect (mainly because my hexagon flowers don’t overlap precisely when kit is closed), it’s still very cute (and roomy!). I cannot thank you enough!
You’re very welcome! So glad you enjoyed the project. :)
Hi again,
I made one, plus some bits to go with it. I have only just started blogging, so I hope it shows up OK on my post. I added a link to you as well, so fingers crossed that works. Thank you again
https://picklepiemama.wordpress.com/2015/07/18/the-hexie-addiction-begins/
Looks great, Jacqui! I love the way your mini thread catcher turned out too–so cute, and so useful. :)
Thanks for this awesome tutorial!!! I just found it recently (probably through pinterest) and made my own. I LOVE it! Here’s my blog post about mine: http://crazy4red.blogspot.com/2015/07/friday-finishes.html
My bag that I made for a gift last year. I plan on making one for me this week.
Hi, Love your Hexie bag. I have made two so far. One for a friend and one for me. I found your instructions very easy to follow. Thank you for designing this little gem. I do give you credit for them whenever I can.
Hi for some reason the fold lines didn’t show up when I printed out the pattern. Could you give me the measurements of where the fold lines are on piece A.
Thanks,
Rebekah
Starting at the top of Piece A (the main pouch), the fold lines are located as follows:
Fold line 1: 1/8″ above the ‘Fold Line’ label (measure from the top of the F)
Fold line 2: 1/8″ below the ‘Fold Line’ label
Fold line 3: 1/8″ below the ‘Fold Line’ label
Fold line 4: 1/8″ below the ‘Fold Line’ label
Alternatively, you can also open the PDF file on your computer and set the view size to 100% (actual size), then you can use a ruler and measure it right on your screen.
Thank you!
Thank you so much for your help just finished mine! Take a look….. https://m.flickr.com/#/photos/139363353@N08/25412507430/
You can also follow me on Instagram @girlsewing to see more of the things I make!
making this today :) thank you for sharing x
Hi! I just started EPP and absolutely love your tutorials. So well put together and thorough. I am now working on this travel kit and was wondering if you thought the seams on the larger pieces could be hand sewn instead of machine sewn? If so, do you recommend a specific type of stitch? Thank you!
Hello! I decided to machine-sew the larger pieces so the seams would be strong enough to hold up with regular use. If I were going to hand-sew the longer seams, I’d probably use backstitch, and place the stitches pretty close together. (That’s definitely not the only right answer, but it’s how I’d approach it.) Hope that helps!
Thanks Haley! I do have a machine but I struggle with it a bit and I’d be so upset if it ruined this project. Thank you for your thoughts. Love your website!
Thanks! I hope all goes well with your project!
Just finished making the kit and am thrilled with it. Thanks so much for the tutorial.
Wonderful to hear! My pleasure!
thank you Diane for wonderful tutorials on Hexagon…. just what I am.looking for…. sending hugs
I made one for a gift! I have pictures, if you want to see them. Great tutorial, I enjoyed it so much!!!
Hi, really nice tutorial. I have no intention of making this for sale, however, I feel I should point out that under U.S. copyright law, you have no say whatsoever in what someone does with items made from your pattern. This is settled law since the early part of the twentieth century. You have rights that prevent anyone from selling your pattern, but once transferred to another party, that person may construct the item and sell it, give it away, or whatever they wish. You cannot rewrite or amend the copyright law just because you wish it were so. I know people frequently try to do this, but is is legally meaningless.
Ah, yes. There’s an awful lot of unenforceable fine print out there! (I was just having a conversation about this with a lawyer pal in regards to signing certain kinds of waivers for things like dental appliances.) So, this is where I stand/why the language that you so rightly called out exists: As a designer, all I can do (beyond the copyright protection afforded to my images/actual copy/patterns/illustrations) is express my preferences about how I would ideally like my work to be used, and hope that people respect those preferences. To me, that’s a pretty important part of the larger creative social contract. But, that said, I totally get that, within the law, people can and will do whatever they want with their finished projects. Legally, that’s not any of my business. (But, the fact that they *can* make a bunch of travel kits to sell doesn’t mean that I shouldn’t tell them that I’d really rather that they didn’t.)
I know I’m looking at this pattern correctly, but what does this mean: “Cut out the pieces, then attach the three sections of pattern piece A with scotch tape at the cut marks.” I don’t see “cut marks” anywhere. Maybe I’m just challenged! Thanks for the tutorial
Hi! The cut marks are the red dotted lines with scissors on each side. I took a screenshot of the PDF pattern and circled an example of it in purple:
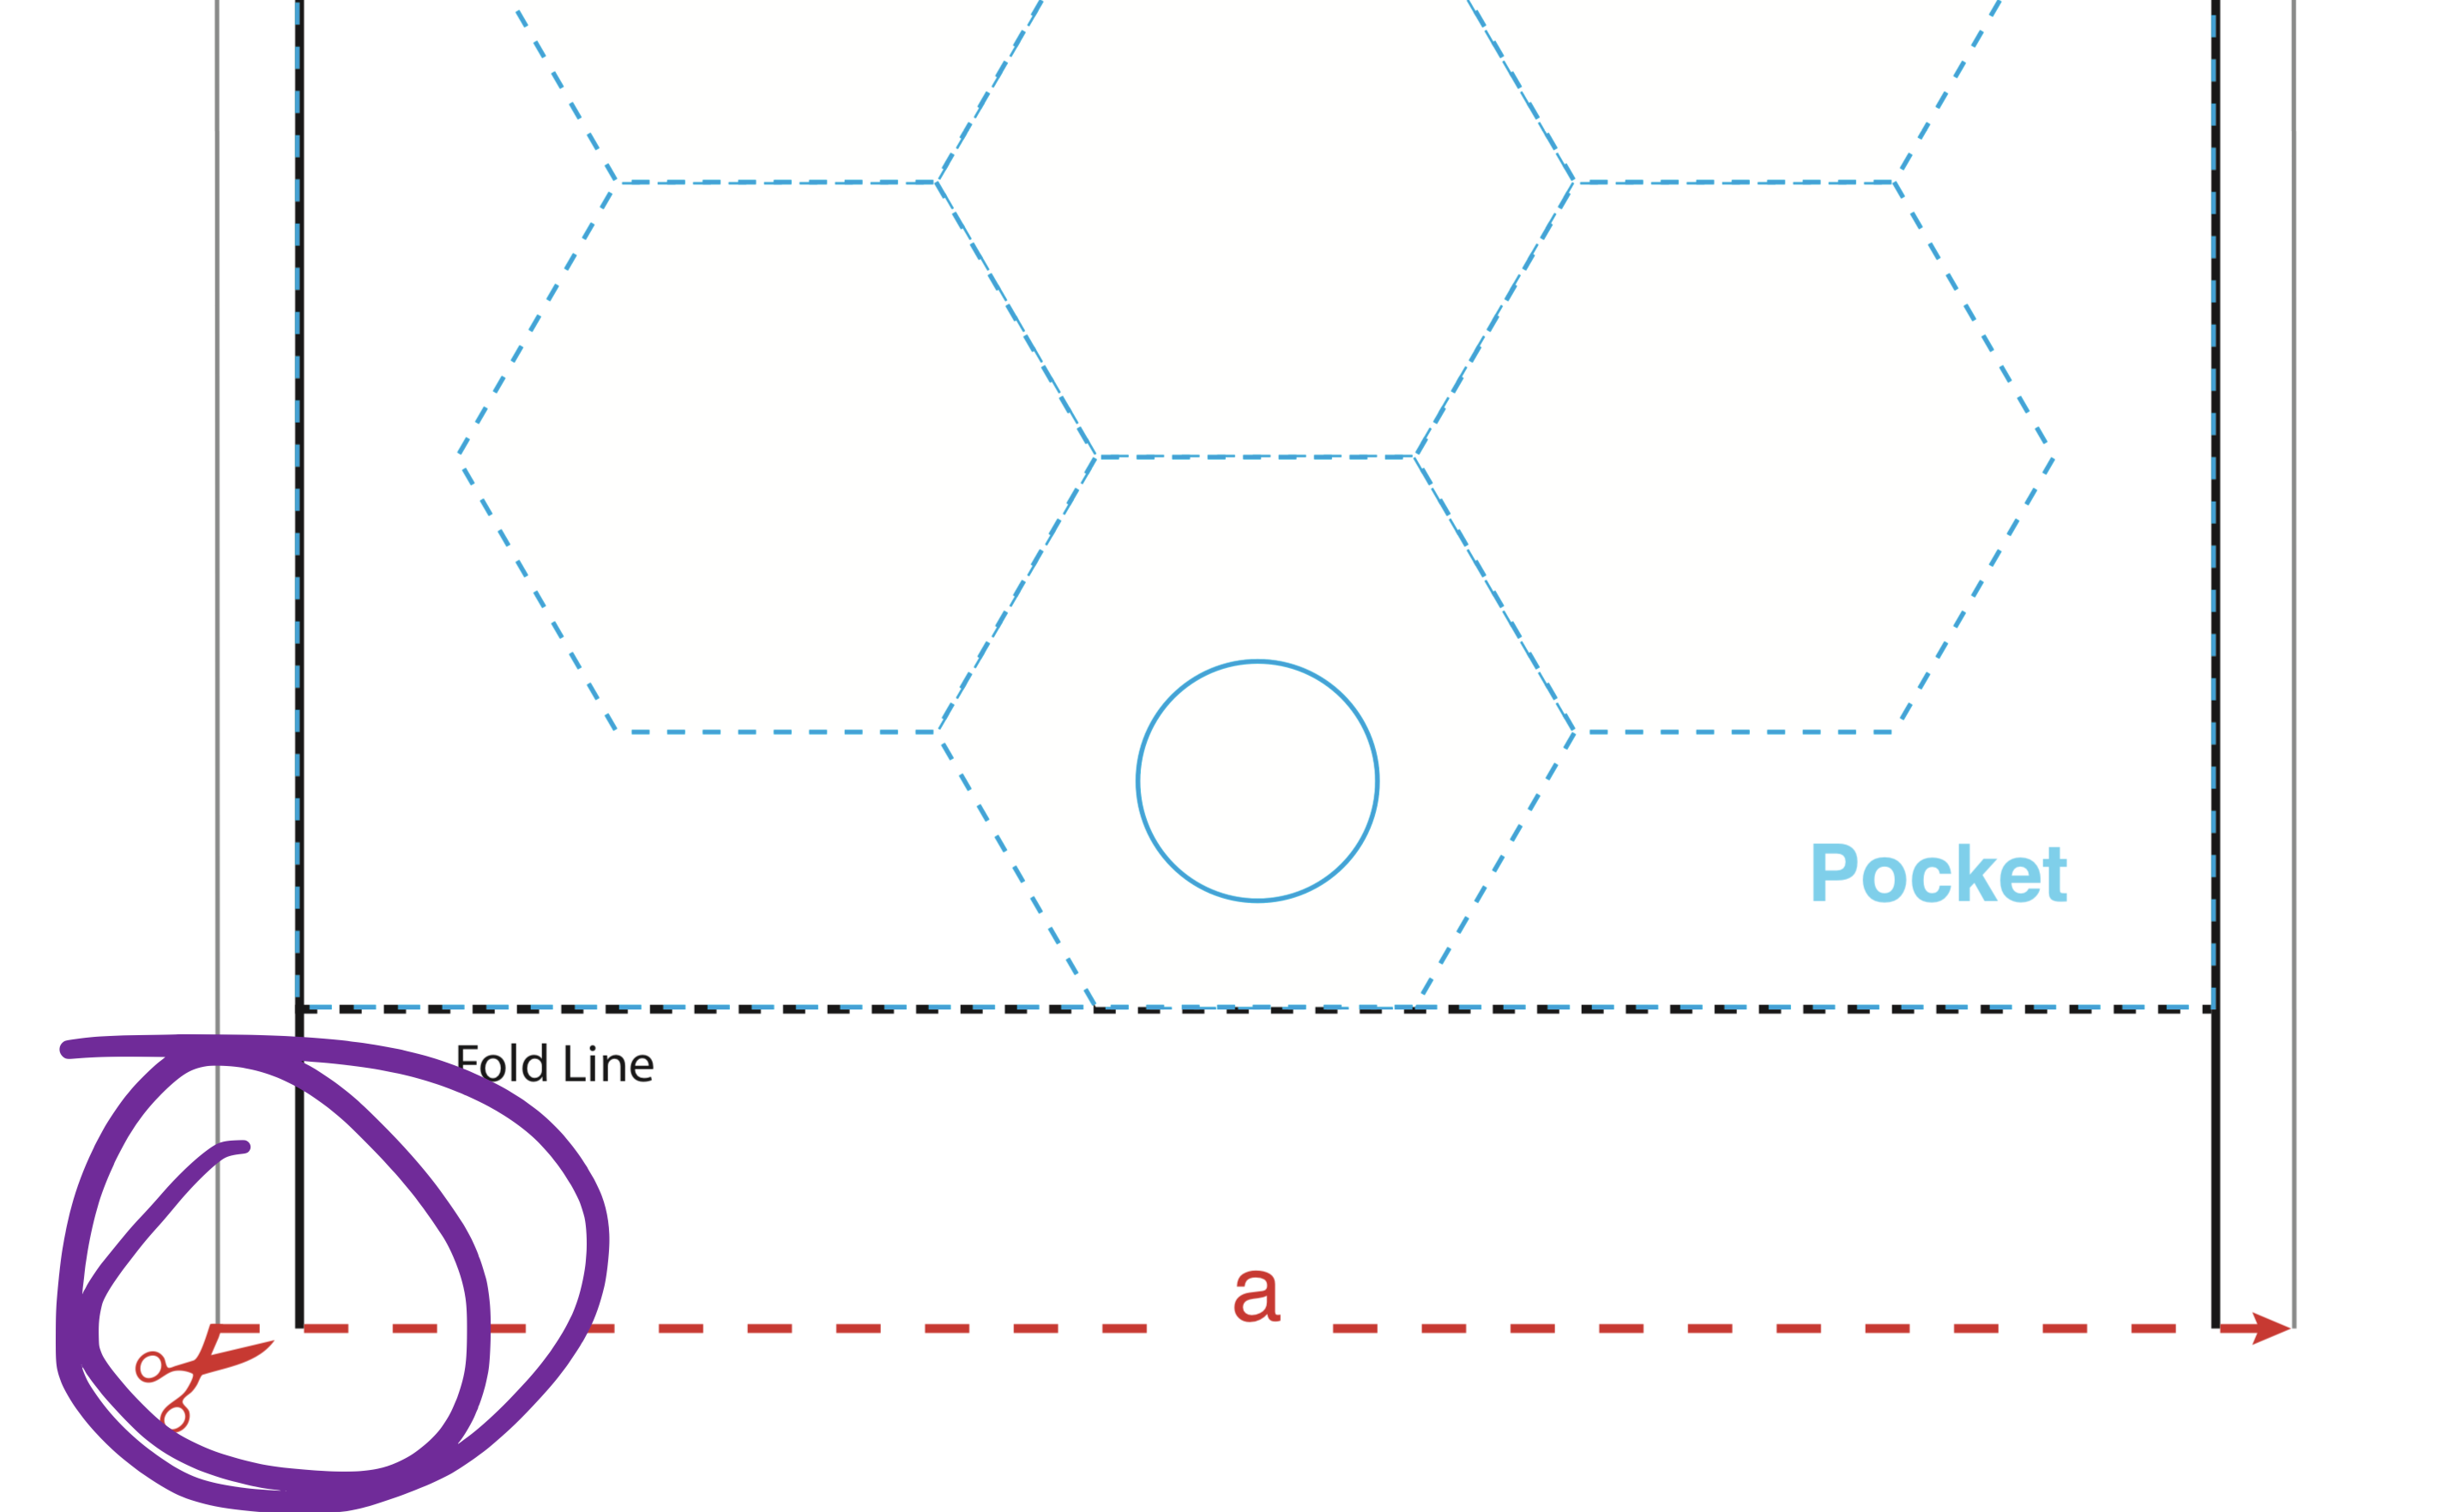
Hope that helps!
I believe I was reading this while drinking!!! Thanks for a great pattern. I can’t believe I asked such a crazy question….duh
you are so kind!!
Hah! No problem!
Yes it did thanks
Where can I post a picture of it
I finished mine, too cute! I wish I could post a pic of it. This was a challenge to me & I appreciate your wonderful instructions & pattern.
Hey check out the Facebook page Respect the void, a page my daughter started for black cat (other cats too) its awesome
Thank you for a wonderful project! I’ve just finished my pouch. Instead of making the separate pincushion, I stuffed the center hexie of the hexie flower attached to the pocket. It looks like a blue floral fried egg :). I’m using Modpodge to cover my little tins in the same fabric.